![Braids & Up Styles Tutorials - Ultimate Guide [35 Videos] - Sam Villa Pro](http://pros.samvilla.com/cdn/shop/articles/SV_2020-04_Braid-_-Upstyles-Guide-892334.jpg?v=1730384764&width=1500)
No matter the occasion, braids and upstyles are always in! You can wear a simple braid to tame frizz on a casual day or create a more complicated upstyle for a formal event – especially during wedding season!
So whether your hair is short or long, thin or thick, curly or straight, susceptible to frizz or flat and lifeless, we have a hair style for you. See below for full tutorials and even more fresh hair ideas.
Braids & Up Styles Guide Overview:
1. The Foundations of Up Styling
Master the foundations of Up Styling to become better at understanding the what, how and why behind Hair Styling.
8 video techniques
View Videos >
2. Short & Medium Length Hair
These techniques will prepare you for success in hairstyles for short and medium lenght hair.
11 video techniques
View Videos >
3. Long Length Hair
Discover multiple ways to take advantage of long length hair in this video series
16 video techniques
View Videos >
1. The Foundations of Up Styling
Foundations are everything when it comes to braiding and creating complicated upstyles. In this series, you’ll learn the basics that will become the foundation to all braids, ponytails and buns that you’ll create. Once you master these techniques, you’ll be set to tackle even the most complicated hairstyles. So, let’s get started!
1. Foundations for Upstyling Series: Foundation 1 - Braids
2. Foundations for Upstyling Series: Foundation 2 - Ponytails
3. Foundations for Upstyling Series: Foundation 3 - Buns
4. Foundations for Upstyling Series: Foundation 4 - Twists
5. 4 Foundations for Upstyles That Last
6. How To Braid Hair | Part 1: Inside Plait
7. How To Braid Hair | Part 2: Outside Plait
8. How To Braid: Part 3 - Twisted Plait
Foundations for Upstyling Series: Foundation 1 - Braids

Romantic, floating up-dos are always a favorite for weddings and events, but how do you create a soft hairstyle that actually lasts all night? Using a braid as the anchor gives your twist strength and structure for a loose, carefree style that won’t fall apart on the dance floor!
If you’re working with fine or freshly-washed hair, texturize the roots with the Sam Villa Signature Series Textur® Professional Texturizing Iron for added grip and volume. Create a narrow cornrow braid in the center of the head and secure with a clear elastic. This braid will form the foundation of your upstyle.
Next, take a 2-inch section from the front and direct it back towards the crown of the head. Use your fingers to soften and tousle the section, twist the hair at the top of the head, and bobby pin it securely to the anchor braid. Pick up a small section of hair from the same side, gently twist the hair over the braid, and pin it into the braid.
Work your way down the braid, picking up hair from each side of the head (as you would for a French braid), twisting it over the cornrow braid, and pinning it into the braid on the opposite side. When you reach the ends, use your fingers to pull out pieces of hair and cover any gaps or holes.
The end result is a gorgeous soft, whimsical braid that will stay in place for hours. If your client prefers an up-do, just twist the ends of the braid into a loose bun and pin it at the nape of the neck.
Watch the video to see exactly how to create this strong and beautiful braided hairstyle!
Back to The Foundation | Back to Main Index
Foundations for Upstyling Series: Foundation 2 - Ponytails

This chic ponytail hairstyle is the perfect simple, low-fuss updo for a gala or party. A modern take on the classic chignon, it comes together in minutes-- and the 3-ponytail foundation keeps this style in place all night long!
Start by dividing the hair into three horizontal subsections. Secure each subsection in a ponytail, working from the top down. The first ponytail should be placed on the right side of the crown, the second ponytail just to the left of center, and the third ponytail at the nape of the neck on the left side. This diagonal line of ponytails forms the “blueprint” for the updo.
Twist the top ponytail in a clockwise direction (to your right) and wrap the hair around the base of the ponytail. Leaving the ends out and pointing to the left, bobby pin the bun securely in place with one pin in the center and one on the side.
Repeat this process with the middle ponytail, working in a counterclockwise direction and leaving the ends sticking out to the right. Then twist and pin the bottom ponytail in place, working in a clockwise direction so that the ends stick out to the left.
Use your fingers to shape and adjust the loose ends to achieve your desired look. For added separation, use the tail of your Sam Villa Signature Series Tail Comb to define the ends. Then seal and smooth the ends with the Signature Series Sleekr Professional Straightening Iron. For an ultra-polished look, bevel the ends so that they lie neatly against the head. Or go bold and curl the ends outward for an eye-catching finish!
This trendy-yet-understated look works for all hair types: create ponytails with weaves or extensions for your short-haired guests, add extra volume with curly ponytails, or let your guest rock her ponytails with bangs!
Watch the video to master this quick, easy and elegant ponytail hairstyle.
Back to The Foundation | Back to Main Index
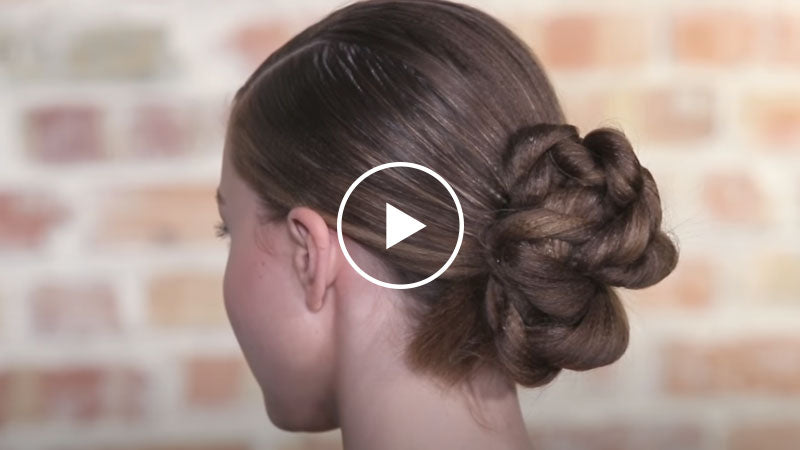
Foundations for Upstyling Series: Foundation 3 - Buns
Looking for a loose, romantic upstyle that’s perfect for wedding season? This lovely soft up-do features flowing waves pinned to a low bun for volume and support. It’s an easy and beautiful hair bun for beginners and experienced stylists alike!
To create this upstyle, section off the hair just behind the ears on each side. Secure this section in a ballet bun at the nape of the neck.
(If your guest doesn’t have enough hair to form a ballet bun, here’s how to make a bun with short hair: gather the hair into a low ponytail, twist the ponytail around itself to create a bun, and secure with small bobby pins).
Prep the front sections of hair with Redken Iron Shape 11 and create soft waves using the Sam Villa Artist Series 2-in-1 Marcel Curling Iron and 1” Wand on the Marcel setting. Work in diagonal forward sections from back to front, alternating the direction of the curls to add interest. Make sure to curl the face-framing sections away from your guest’s face! When you finish curling, rake through the waves with your fingers to break up the curl pattern.
Now it’s time to secure the waves to the bun. Take a diagonal back section of hair, twist and wrap it around the top of the bun and pin it to the side of the bun. Repeat on the other side, crossing the hair over the top of the bun. Pin the rest of the waves to the center of the bun, leaving the ends loose.
Let your artistic side shine as you pin the ends to the scalp, working with the curl to create the shape you want.
It’s that easy! The bun gives this upstyle strength and fullness, and the textured waves look effortlessly beautiful all night long. Watch the video to discover the exact steps for this perfect updo.
Back to The Foundation | Back to Main Index
Foundations for Upstyling Series: Foundation 4 - Twists

Shake it up, work it out, twist and shout with this beautiful braided upstyle! A half-up twist adds fullness and soft, flexible strength that’s perfect for fine-haired folks.
To create the twist foundation, pick up a small section of hair just above the ear on each side. Twist each section away from the face and secure the two sections at the back of the head with a clear elastic. Then add texture to the hair by curling random sections with the Sam Villa Artist Series 2-in-1 Marcel Curling Iron and 1” Wand.
Standing on the right side of the head, take a section of hair just below the twist on the left side. Create a loose 3-strand braid, directing the hair towards the right side. Secure the end with a clear elastic and pancake the braid by pulling out small pieces from the bottom row.
Lay the braid over the top of twist, using bobby pins to attach the center of the braid to the twist. Tuck in and pin any loose ends. Repeat the process on the opposite side, but this time pancake the top of the braid.
And there you have it! A gorgeous twist-braid hairstyle with lots of soft movement.
Watch the video to add this easy technique to your upstyling arsenal!
Back to The Foundation | Back to Main Index
4 Foundations for Upstyles That Last

Do you ever panic when a client pulls out her phone and shows you an inspiration picture on Pinterest? How do you create the hair upstyle she wants and make sure it holds all night? The secret to beautiful, long-lasting upstyles is using some of the hair to build a strong foundation. This creates a “blueprint” for the look and keeps it from falling apart quickly.
Make sure to consider your guest’s hair type, length and desired style when choosing a foundation. A narrow cornrow braid forms a strong anchor and can travel across the head in any direction, making it a great option for floating twists and other soft styles. For your guests with thick or heavy hair, consider a 3-ponytail foundation. This helps you secure the hair to the head for a stronger, more compact upstyle. A low ballet bun adds strength and fullness to romantic bridal styles. Beautiful soft waves float over and around the bun for a feminine upstyle that will hold up to a night of dancing.
Watch the video to find out the fourth foundation (hint: it’s perfect for creating half upstyles in fine and medium hair!). Once you add these four upstyle foundations to your styling toolkit, you’ll know exactly what to reach for to give her an updo she’ll love!
Back to The Foundation | Back to Main Index
How To Braid Hair | Part 1: Inside Plait

Master the fundamentals of braiding hair with this step-by-step inside out braid tutorial. Learning the correct hand position and braiding rhythm for the basic three-strand braid allows you to keep complete control of your sections and have one hand free to add hair to the braid.
To do a narrow inside out braid, use your Sam Villa Signature Series Tail Comb to pick up a diagonal forward section of hair from the front. Over-direct this section back towards the high point of the head and use your fingers to slice the hair into three equal sections.
Now place the right section into the palm of your right hand, pinch the middle section with your right thumb and index finger, flip your middle finger over the center section, slide the left section to the middle and pinch it between your right thumb and index finger.
Repeat on the opposite side: place the left section into the palm of your left hand, pinch the middle section with your left thumb and index finger, flip your middle finger over the center section, slide the right section to the middle and pinch it between your left thumb and index finger. Continue this braiding rhythm: palm, pinch, flip, middle, alternating sides as you work your way down the hair. If desired, create a narrow French braid by adding small slices of hair to the middle section before changing hands. The rhythm then becomes palm, pinch, flip, middle, slice and feed hair to the center.
This simple inside plait technique gives you a solid foundation for more advanced braided hairstyles. As you’re learning this hand position, try practicing with ropes before moving on to hair. Watch the video to discover how to do an inside out braid with confidence and control!
Back to The Foundation | Back to Main Index
How To Braid Hair | Part 2: Outside Plait

Master the fundamentals of braiding hair with this simple method for creating an outside braid. Using a “stacked position” with your fingers enables you to have one hand free at all times-- perfect for French braids or other styles that require you to add hair as you work!.
Start by prepping dry hair with Redken Braid Aid 03 for more slip. Using your Sam Villa Signature Series Tail Comb, pick up a diagonal forward section of hair from the front. Over-direct this section back towards the high point of the head and use your fingers to slice the hair into three equal sections.
Now place the right section into the palm of your right hand, pinch the center section with your right thumb and index finger, and stack your thumb, index finger and middle finger together by pressing your middle finger against the nail of your index finger. Place the left section underneath the center section and pinch it between the index and middle fingers of your right hand.
Next, place the center section into the palm of your left hand and pull it to the left side. Pinch the left and center sections with your left thumb and index finger (the two sections should form an X shape). Stack your left thumb, index finger and middle finger together with the right section pinched between the index and middle fingers of your left hand.
Continue this braiding rhythm: palm, pinch, stack, alternating sides as you work your way down the hair. If desired, create a narrow French braid by adding small slices of hair to the section pinched between your index and middle fingers. The rhythm then becomes palm, pinch, stack, slice and feed. Having one hand free during the braiding process allows you to clean up the sections and add hair with ease!
This simple outside French braid technique gives you a solid foundation for more advanced braided hairstyles. As you’re learning this hand position, try practicing with ropes before moving on to hair. Watch the video to discover how to do an outside braid with confidence and control!
Back to The Foundation | Back to Main Index
How To Braid: Part 3 - Twisted Plait

Master the fundamentals of braiding hair by learning this beautiful twisted plait technique. Gripping the hair with your fingers in a “stacked” position helps you create a cool rope braid effect by maintaining tension in the braid.
To create this twisted hair plait, prep dry hair with Redken Braid Aid 03 and separate a diagonal forward section from the front of the head with your Sam Villa Signature Series Tail Comb. Split this hair into three equal sections and twist the hair away from the face.
Now place the right section into the palm of your right hand, pinch the middle section with your right thumb and index finger, and use your left hand to twist the left section towards the face. Bring it under the other sections, grip it between the index and middle finger of your right hand, and stack your thumb, index finger and middle finger together.
Next, place the center section into the palm of your left hand and pull it to the left side. Pinch the left and center sections with your left thumb and index finger (the two sections should form an X shape). Flip your middle finger over the center section and cross the right section over the center section. Twist the new center section towards the face.
Continue this braiding rhythm, alternating between the “under position” (palm, pinch, under, stack) and the “over position” (palm, pinch, flip, over) as you work your way down the hair. In-between positions, twist the center section towards the face and add a small slice of hair.
The result is a stunning twisted inside-out plait that hugs the head shape. As you’re learning this hand position, try practicing with ropes before moving on to hair. Watch the video to discover how to create a twisty hair braid with confidence and control!
Back to The Foundation | Back to Main Index
2. Short & Medium Length Hair
Short haircuts are coming back in a big way. From short pixie cuts to mid-length bobs and lobs, There’s never been a better time to go for a short haircut. However, one of the biggest drawbacks that can stop women from cutting their hair short is their ability (or lack thereof) to style their hair into braids or updos.
Don’t worry, we’ve got you covered! Whether you need inspiration for an updo for a wedding or party, or you simply want to know how to create easy ponytails and braids to wear during the day, these are the best braiding and updo hairstyle tutorials for short to mid-length hair.
1. Basket Weave Braid on Curly Hair
2. How to Create a Four Strand Push Up Braid
3. Basket Weave Braid Hairstyle Tutorial
4. Ponytail Curl
5. Half Up Half Down Hairstyle Tutorial
6. How To Create a Curly French Twist
7. Simple and Unique Braid Tutorial - The Ring Braid
8. Crossover Loop Ponytail
9. Ponytail Pull-Through - Adding Interest to a Ponytail
10. How to Create a Chain Braid
11. How-to create a Waterfall Braid
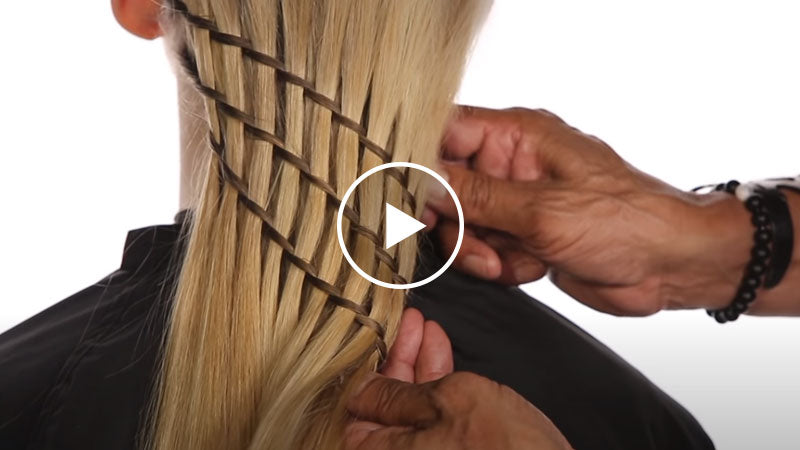
Basket Weave Braid on Curly Hair

This simple basket weave braid is one of the best types of braids for curly hair! It’s a quick and easy way to add visual interest to a curly hairstyle.
For easier braiding, prep the hair with Redken Dry Shampoo Paste 05 to add separation, grip and workable hold. Pick up a small section of hair from the front of the head at the temple area. Grip this section with your thumb and middle finger, using your index finger to split the section into two pieces. Twist the section away from the face. Separate the two pieces of hair and hold one section in each hand. Pick up a small vertical section of hair from the top of the head and lay it in between the two pieces. Twist the two pieces away from the face to “lock” the new section in place. Repeat this process 2-3 times until your desired style is achieved, then secure the braid with a clear elastic.
Create the second row by picking up another section of hair from the temple area, just below the first braid. Repeat the braiding process, twisting the hair around the vertical sections from the upper braid. After twisting the hair around the last section, secure the two braids together with a hair ring or decorative clip (if desired). Finish the look with Redken Triple Dry 15 for airy volume and texture.
This unique double side braid comes together in minutes and works wonderfully for short and mid-length curly hair. Watch the video to learn how to create this gorgeous basket weave braid hairstyle!
Back to Short & Medium Length Hair | Back to Main Index
How to Create a Four Strand Push Up Braid

This four strand push up braid is a gorgeous hairstyle for short, mid-length or long hair of all textures! It looks complicated, but with a little practice you’ll be creating this style in no time.
A top tip for easier braiding is to prep the hair with Redken Dry Shampoo Paste 05. This adds separation, grip and workable hold (no more slipping!). Just apply a nickel-sized dab of paste to your palms and emulsify before styling.
To start the four strand braid, pick up a small section of hair from the top of the head. Work the Dry Shampoo Paste through the hair as you overdirect it to the opposite side of the hair part. Use your index, middle and ring fingers to divide the hair into four equal sections. Imagine each section as having a number: 1 for the section that is closest to the face, then 2, then 3, then 4 for the section that is farthest from the face.
Working from right to left, bring Section 4 under Section 3, then over Section 2. (Leave Section 1 out.) Then working from left to right, bring Section 1 over Section 2, then under Section 3. (Leave Section 4 out.) Repeat this process as you move down the hair. Remember, braiding is all about finding the rhythm! Think right, under, over then left, over, under.
When you reach the ends of the hair, gather Sections 1, 3 and 4 together in one hand. Leaving Section 2 loose, push Sections 1, 3 and 4 up to the scalp. Then gently tug the braid back down, using your fingers to shape and adjust the braid as desired. The result is almost magical-- a 4-strand weave braid that looks like an intricate headband. To finish this look, simply tuck the braid behind the ear, pin it in place, and let the rest of the hair fall naturally over the braided band.
Watch the video to discover how to create this easy and beautiful braided hairstyle!
Back to Short & Medium Length Hair | Back to Main Index
Basket Weave Braid Hairstyle Tutorial
Learn how to create a simple basket weave braid hairstyle in this tutorial with Sam Villa! Due to its versatility, the basket weave is one of the best types of braids for all hair lengths and textures. A simple 2 strand twist technique creates a lovely waterfall effect that adds interest to many different hairstyles.
Begin by combing the hair back away from the face. Apply Redken Outshine 01 to your hands and emulsify the product in your palms before styling. This fights frizz, smoothes and polishes the hair, and makes the hair easier to braid.
Then pick up a small section of hair behind the ear and use your index finger to split it in half. Twist this section away from the face. Gripping both halves of the twisted section in your left hand, use your right hand to pick up a small vertical section of hair from the top of the head. Place this piece in between the two twisted sections. Twist the two pieces away from the face to “lock” the new section in place.
Repeat this process (separate the two pieces, grab a vertical section, place it in between, twist the two sections around the new section) as you work your way across the head. When you finish, secure the braid with a small clear elastic.
This is a great opportunity to get creative-- braid straight across the top of the head or make a diagonal line! If you want to create a double or triple basket weave braid, pick up another section of hair behind the ear (just below the first braid) and repeat the steps, using the same vertical sections as those used in the upper braid.
Once you’ve created your desired number of braids, take the section with the elastic(s) and fold it under the rest of the hair. Secure in place with a long grip. Then finish off the style however you like-- put the ends in a low ponytail, create a sleek tucked-under bun, or leave the hair loose for an editorial look! The sky is truly the limit with this easy basket weave braid hairstyle.
Watch the video to master this must-know braiding technique!
Back to Short & Medium Length Hair | Back to Main Index
Ponytail Curl

Give your salon guests extra value by teaching them how to curl their hair in a high ponytail. This is an easy way for guests to avoid iron burns when styling their hair at home, and it’s a great time-saving technique in the salon as well!
To start, pull the hair into a high ponytail and secure with a bungee. Prep the hair with Redken Iron Shape 11 for heat protection and a shiny, polished finish. Using the tail of your Sam Villa Signature Series Tail Comb, pick up sections from the ponytail at random. Take smaller sections to create tight curls, or larger sections for loose waves. Curl each section with the Sam Villa Artist Series 2-in-1 Marcel Curling Iron and Wand on the “wand” setting.
For a multi-textured finish, work in different directions and vary the curl type!
Try alternating between flat wrap and twist wrap techniques-- it’s OK if some curls are slightly more defined than others. Continue until all of the hair in the ponytail is curled.
This look can stand alone as a curly ponytail or wavy ponytail! If you’re going for flowing curls, take out the ponytail bungee and have your guest “flip and shake” her hair. Use your hands and comb to shape the final look, but avoid brushing through the curls. Finish off by spraying Redken Fashion Work 12 into your hands and gently scrunching the curls for medium hold and frizz control.
Watch the video to learn a variety of techniques for creating curly hairstyles using a simple ponytail!
Back to Short & Medium Length Hair | Back to Main Index
Half Up Half Down Hairstyle Tutorial

Looking for a super-quick half up half down hairstyle? Look no further! In this easy hairstyle tutorial, Sam Villa shares a way to create massive visual value by backcombing and wrapping large sections together. The result is a simple and chic half-upstyle that can be customized in so many ways for your salon guests!
To get started, create a triangle-shaped section from the recession area on both sides to the top of the crown. Secure the rest of the hair in a ponytail.
Use the Sam Villa Signature Series Tail Comb to separate a horizontal subsection from the tip of the triangle section. Apply Redken Control Addict 28 (a strong hold hairspray), over-direct forward, and backcomb the subsection with your tail comb. Lay the backcombed section against the head, pick up another horizontal subsection, and continue this process as you work your way forward.
When the entire triangle section has been backcombed, lay the comb flat and glide it over the hair to smooth out any bumps. Secure the triangle section with an elastic over the point of the triangle. Use your comb to adjust the shape of the hair, then pin it into place.
Next, take the hair out of the ponytail and separate a curved section of hair just behind the ear at the top of the crown. Over-direct this section forward, spray it with Redken Control Addict 28, and backcomb as before. Bring the section back, twist it over the center section (twisting the hair towards the face), and pin it in place. Repeat on the other side of the head, making sure not to pick up any hair from the twist.
Pick up the ends of the twisted hair and clip them on top of the head. Separate a section of hair above the ear, twist it (without backcombing) and pin it underneath the top section. Repeat on the other side of the head. Release the hair from the clip, comb through the ends, finish with more hairspray and you’re done!
Watch the video to master this easy and beautiful half up half down hairstyle.
Back to Short & Medium Length Hair | Back to Main Index
How To Create a Curly French Twist

Looking for a fresh take on the classic French twist hairstyle? This light, floaty twist is secretly rock-solid and a perfect long hair upstyle for straight or curly hair!
The key to this curly French twist is to start with a narrow cornrow braid along the center line of the hair. Braid from the front hairline down to the tips of the hair and secure this anchor braid with an elastic. Then lift up the ends and pin them tightly to the right side of the braid.
Next, use your Sam Villa Signature Series Tail Comb to create a diagonal line from the high point of the head to the outer corner of the eye on each side. Join these two sections together, over-direct them forward and clip them out of the way on top of the head.
Use the Sam Villa Artist Series Finishing Brush to smooth back the hair on the right side, brush it tightly over the anchor braid, and secure it to the center of the braid with long pins. Rake through the hair on the left side with your fingers, direct it towards the right side and create a twist over the anchor braid. Slide hair pins directly into the anchor braid to secure the twist, working from the bottom of the twist up. Shape and adjust your twist with your fingers. (It’s okay if the ends are poking up out of the twist at this point!)
Now release the sections at the crown and curl the hair forward with the Sam Villa Artist Series 2-in-1 Marcel Curling Iron & Wand 1” with the Marcel clip. Curl the ends of the twist so that they blend in with the hair on top, taking care not to disturb the twist.
Rake through the curls with your fingers, direct the hair back towards the top of the upstyle, twist the hair and pin it into the braid foundation. Then flip the curled ends forward over the crown of the head and move them into place. This is your chance to get creative and really shape the look you want! Use bobby pins to secure the curls to the anchor braid, making sure the braid is fully concealed. Finish with Redken’s Wax Blast hairspray and use your curling wand to touch up the curls as needed.
And that’s it! Watch the video to learn how to do a curly French twist!
Back to Short & Medium Length Hair | Back to Main Index
Simple and Unique Braid Tutorial - The Ring Braid

Looking for a quick and simple braided hairstyle that works on a variety of hair lengths? This gorgeous braid ring is easy to create and a wonderful way to add visual interest while emphasizing your guest’s facial features.
Start by prepping the hair with Redken Braid Aid 03 for added slip. Use your Sam Villa Signature Series Tail Comb to separate a diagonal forward section from the front of the head. Holding this section in your left hand, take a smaller diagonal subsection (next to the hairline) in your right hand.
Grip the right subsection between your right thumb, index and middle fingers and wrap the hair around your ring finger. Rotate your right hand toward your guest’s face so that your palm is facing up. Use your left hand to grab the ends of the right subsection and bring them under the larger section. Flip the ends up towards the ceiling, then pinch them between the index and middle fingers of your right hand and pull them through the gap between the two sections. Join the ends with the rest of the hair.
Hold the main section in your left hand and pick up another small subsection from the hairline. Repeat the same braiding rhythm: pinch, flip the ends under and up, pull through, join with the rest of the hair. Continue working your way down the hairline, adding small subsections and maintaining tension with your left hand. Once you’ve added the hair behind the ear, secure the infinity braid ring with an elastic and repeat the process on the opposite side. Join the two braids with an elastic at the center back of the head.
The result is a delicate braided style that comes together in minutes and looks like a series of tiny “rings” around the hair. It’s perfect for festivals, fairs, wedding season, and so much more! Watch the video to learn how to create this beautiful ring braid.
Back to Short & Medium Length Hair | Back to Main Index
Crossover Loop Ponytail

Without fail, women can turn to the trusted ponytail for any occasion.
The ponytail is a hairsyle that can be worn casual or dressed up for a special event or night out on the town!
But how do we take a simple ponytaile and turn it into a style that is elegant and unique...in under 5 minutes?
The Crossover Loop Ponytail is simple, has tons of character and visual interest and the best part ... it only takes a few minutes to do!
Watch the video to discover just how fast and simple it can be to upgrade your ponytail and leave everyone wondering just HOW it was done!
Back to Short & Medium Length Hair | Back to Main Index
Ponytail Pull-Through - Adding Interest to a Ponytail

A ponytail pull-through is a fast and simple way to add interest to a simple ponytail.
Sam Villa shares this easy technique that begins with a foundational blow dry for smoothness.
Create 3 section with the middle being the ponytail, and then cross section through the ponytail!
Back to Short & Medium Length Hair | Back to Main Index
How to Create a Chain Braid

Discover how to create a chain braid with 3 strands and, as always, Sam Villa keeps it simple and easy to do. A chain braid gives an interesting open texture that can be finished in multiple ways to add visual value to your styles!
Watch as he begins with rope and moves the technique into hair which is an excellent way to train yourself on braids.
Back to Short & Medium Length Hair | Back to Main Index
How-to create a waterfall braid

Sam Villa demonstrates how to create a waterfall braid, but modified! Learn how you can create the illusion of a basket weave but with the character of a waterfall braid in this how-to video.
Back to Short & Medium Length Hair | Back to Main Index
3. Long Length Hair
Enhance your daily hair routine by recreating one of our awesome braid or upstyle tutorials for long hair. From fishtail braids to updos and messy ponytails with MEGA volume, you’ll find a tutorial that suits your hair type and braiding ability with this ultimate guide to braiding and styling long hair.
1. How to Create a Unique Braid with a Crochet Technique
2. Easy Bubble Braids Tutorial
3. Box Fishtail Braid - Four Sided Fishtail Tutorial
4. Ponytail Side Knot Tutorial
5. How to Create a Bushel Braid Hair Style
6. Knotted Fishtail Braid Ponytail
7. How to Create a Triangle Ponytail and Finish with a Fishtail Braid
8. Ponytail Hairstyles: Twisted Bun Updo
9. How To Create a Twisted Loop Headband Braid
10. How To Create a Twisted Mohawk | Faux Braided Updo
11. Bubbles Up Style Technique
12. Waterfall Braid Scarf Up Style
13. How to Create a 4 Strand Twist Braid
14. How to Put a Braid in a Braid
15. French Pull-Through Braid Ponytail
16. Attached Fishtail Mohawk Braid Into a Ponytail
How to Create a Unique Braid with a Crochet Technique

Here’s a unique crochet braid that’s perfect for long hair. Sam Villa shows you how to weave the hair like fabric, using your fingers as a crochet hook to build gorgeous visual texture that looks completely different from most braided hairstyles.
Start by creating a rectangular section on top of the head. Clip this hair out of the way with a Sam Villa Dry Sectioning Clip for strong, crease-free hold. Next, separate a small section of hair at the nape area and secure it in a low ponytail. Split the remaining hair into two equal sections at the midline.
Take a diagonal forward section from the temple area on the right side and apply Redken Rough Paste 12 to help the crochet braid hold together. Gripping the section in your right hand, bring the index and middle fingers of your left hand to the outside of the section. Create a loop in the hair by twisting your two fingers in a counterclockwise direction. Grip the “tail” of the hair between your index and middle fingers and pull it through the loop. Slide your index and middle fingers back inside the loop and tighten by pulling on the tail.
Pick up another section of hair just below the first section and add it to the tail. Repeat the crochet pattern (pinch the hair between your index and middle fingers, pull through the loop, put your fingers inside the loop, pull the tail to tighten). Pick up a vertical section and continue “crocheting” the hair. When you reach the center-back of the head and you’ve incorporated all the loose hair on the right side, repeat the crochet pattern without picking up hair. When you reach the ends of the hair, secure the braid with a Dry Sectioning Clip.
Repeat the braiding process on the left side, bringing your fingers to the inside of the first section instead of the outside. Remember your braiding rhythm: pick up a slice of hair, place it between the middle and index fingers, pull through, tighten. When both braids are finished, fold them against the head and pin them in place, making sure to tuck the ends.
Unclip the top section of hair and divide it in half at the midline. Use the same crochet technique to braid each section without picking up hair. Pin both braids to the head above the first two braids.
To finish this look, take the hair at the nape out of the ponytail and use your fingers to pull and shape the braids. The end result is an intricate, visually stunning upstyle with great holding power. It looks tricky, but with a little practice you’ll be crocheting hair (and wowing your salon guests!) in no time.
Watch the video to learn the exact steps for creating these beautiful long crochet braids!
Back to Long Length Hair | Back to Main Index
Easy Bubble Braids Tutorial

Want to add MEGA volume, texture and thickness to your bubble braids and mohawk braids? The secret is to prep the hair with the Sam Villa Signature Series Textur® Professional Texturizing Iron. The Textur’s small ridges compress the hair, adding grip and structure to help it hold your desired shape!
After texturizing all the hair, create a center part and divide the hair in half at the midline. Starting on the right side of the head, take a small triangular section above the forehead. (The center part should form one side of the “triangle”, and the forehead should form another side.) Comb through the section and secure it tightly against the head with a clear elastic.
Pick up a diagonal section underneath the first section, comb the two sections together, and secure with another elastic. Make sure to hold the ends away from the loose hair to keep your bubble braid neat! Use your fingers to puff out the “bubble” of hair in between the two elastics.
Continue this process until you reach the nape of the neck and all the hair is incorporated. This fun style doesn’t require perfection, but try to space the ponytails evenly (about 1-2 inches apart, depending on the hair’s density). You can choose whether you prefer to create more bubbles in the “tail” of the hair, or leave the ends loose.
Repeat this process on the other side of the head, then use your fingers to get the shape just right. And that’s it! Your guests will LOVE this full, voluminous braid.
Watch the video to master this simple yet trendy bubble braid technique!
Back to Long Length Hair | Back to Main Index
Box Fishtail Braid - Four Sided Fishtail Tutorial

Take the basic fishtail braid up a notch with this four-sided fishtail braid tutorial. Splitting the small sections in half and wrapping them around the larger sections creates a cool boxy shape with a fishtail on all four sides!
Start by securing the hair in a low ponytail, as you would for a standard fishtail braid. Apply Redken Outshine 01 to your hands for added control, then divide the ponytail into two equal sections. Use your index finger and thumb to pick up a small piece of hair from the outside of the right section and slice it in half. Push your thumb and index finger apart to open up the two halves and wrap them around the right section. Add the two small pieces to the left section.
Holding the right section in your palm and pinching the left section with your index finger and thumb, use your other hand to pick up a small piece of hair from the outside of the left section. Slice the piece in half and use your thumb and index finger to separate the two halves and wrap them around the left section. Add the two small pieces to the right section.
Continue this process, alternating sides as you move down the hair. The keys to a successful four-sided fishtail braid are to maintain tension and pick up the same amount of hair every time. When you reach the ends, secure the braid and use a bobby pin to cover the elastic with a small piece of hair.
To take this look from day to night, grab some Redken Fashion Work 12 and your Sam Villa Signature Series Sleekr® Professional Straightening Iron. Apply the Fashion Work 12 to the back of the head above the braid and use your fingers to massage and pull out small pieces of hair. Place the Sleekr’s plates at a 90° angle to the head and open and close the iron around the pieces. This creates small fins in the back of the hair for added visual interest.
There you have it! A leveled-up fishtail braid that’s WAY easier than it looks. Watch the video to learn how to create this box fishtail braid with a unique finishing touch!
Back to Long Length Hair | Back to Main Index
Ponytail Side Knot Tutorial

Learn a quick and easy hair hack for creating a side ponytail upstyle in this tutorial with Sam Villa! A ponytail becomes a cool side braid, and then transforms into a soft, lived-in updo. It’s like magic!
Start by prepping the hair with Redken Dry Shampoo Paste 05. This versatile dry shampoo and styling paste combo absorbs oil, gives the hair separation and grip, and provides workable hold. Now you’re ready to style!
Here’s how to do a side ponytail knot:
Secure the hair in a low side ponytail and use your fingers to tease out the crown for added volume. Apply extra Redken Dry Shampoo Paste 05 to the tail of the ponytail. Separate a small section on the right side of the ponytail and work the product through the hair.
Wrap the small section underneath and around the ponytail, then pull it back through the loop you just created. Adjust the loop to hide the ponytail elastic and tighten it by pulling on the end of the section.
Pick up another small section from the right side of the ponytail and add it to the first section. Loop this section underneath and around the ponytail, then pull the end through. Repeat this process until you have added all of the hair, then secure the braid to the head with a large U-shaped hairpin.
And that’s it! This super-simple side ponytail knot takes less than 5 minutes and looks beautiful for any occasion.
Watch the video to add this speedy styling technique to your updo arsenal!
Back to Long Length Hair | Back to Main Index
How to Create a Bushel Braid Hair Style

This unique bushel braid hair style will make your guests swoon! It’s a great braid technique to keep in your back pocket and pull out when a client asks for a special Pinterest-inspired braid.
Start by creating a half-up ponytail, sectioning the hair at the level of the corner of the eyes. Clip it out of the way with a Sam Villa Dry Sectioning Clip. Create a second half-up ponytail right below the first one. These two small ponytails form a strong foundation for this braid hair style.
Take a section of hair from the left side of the top ponytail, and a matching section of hair from the left side of the lower ponytail. Hold the bottom section in the thumb and index finger of your left hand. Form an “OK” sign with your hand and rest the upper section of hair against the three open fingers.
With your right hand, pick up another section of hair from the left side of the lower ponytail. Move this section up and over the upper section of hair and place it into the thumb and index finger of your left hand. Release the upper section of hair.
Repeat this process (pick up a section of hair from the top ponytail, place it against the 3 open fingers, pick up a section of hair from the lower ponytail, cross it up and over the upper section, add it to your thumb and forefinger, release the upper section). Make sure to be consistent with your section sizes!
When you’ve incorporated all the hair from both ponytails, separate the top and bottom sections and clip the top section out of the way. Form another half-ponytail with the bottom section and some of the loose hair, and secure with an elastic.
Unclip the top section and create a second bushel braid, using the existing segments from the top section. Separate the top and bottom sections and clip the top section out of the way, then secure the bottom section with an elastic.
Once you’ve created your desired number of bushels, use your Sam Villa Signature Series Tail Comb to “blouse” the bushels by pulling out each individual segment. You can also use your fingers to pinch and pull out sections.
These gorgeous bushel braids would add visual interest to almost any style. Try securing the bushels in a low ponytail, braiding the ends of the hair, or pinning up the ends for an eye-catching upstyle. The possibilities are endless!
Watch the video to master this simple and beautiful braid technique.
Back to Long Length Hair | Back to Main Index
Knotted Fishtail Braid Ponytail

Looking for a fun spin on the basic fishtail braid? Check out this knotted fishtail braid ponytail tutorial from Sam Villa. An unbelievably simple pattern of basic knots (if you can tie your shoe, you can do this!) creates a full, highly textured visual effect.
Prep the hair with a directional blow dry, then pre-texturize sections with the Sam Villa Signature Series Textur® Professional Texturizing Iron for added volume and grip. Secure the hair in a low ponytail and apply Redken Braid Aid 03 to your hands.
Pick up two small sections from underneath the hair (one section from each side) and tie them in a single knot on top of the ponytail. Wrap the section ends underneath the ponytail, crossing them over each other, and bring them back up to the top. Add a small piece of hair to each section (as you would for a classic fishtail braid). Tie the two sections in another knot on top of the ponytail, just below the first knot.
Continue this rhythm (wrap around, criss-cross underneath, bring the sections to the top of the ponytail, pick up hair, tie a knot) as you work your way down the hair. Don’t forget to add extra Redken Braid Aid 03 to your hands for extra grip and hold!
When you reach the ends of the hair and tie your final knot, bring the section ends underneath the ponytail and secure them together with a small elastic.
There you have it-- a quick way to add visual value to a simple ponytail! Watch the video to learn how to create this easy and beautiful fishtail braid ponytail.
Back to Long Length Hair | Back to Main Index
How to Create a Triangle Ponytail and Finish with a Fishtail Braid

Searching for an easy long hair upstyle that looks stunning for daytime or evening occasions? Check out this triangle ponytail and fishtail braid tutorial! The combination of simple twists on top and a tucked fishtail braid underneath creates eye-catching contrast, while applying dry texture spray and teasing the hair gives you light and airy volume.
Start by using your Sam Villa Signature Series Tail Comb to separate a triangle-shaped section of hair at the crown of the head. Over-direct this hair forward, spray with Redken Triple Dry 15, and tease the underside of the section with the Sam Villa Artist Series Finishing Brush. Then brush the section gently back into place, twist and pin it at the back of the head. With your tail comb, pick up a curved section just to the left of the twist and over-direct it to the left side. Gently tease this section with the comb placed flat and vertical to the hair, apply Redken Triple Dry 15, twist it over the first section, and pin it into the right side of the twist. Pick up a curved section of hair to the right of the twist and repeat this process, pinning the hair into the left side of the twist.
Now separate the ends from the three twisted sections and clip this hair out of the way. Pick up a section of hair from above the right ear, spray it with Redken Triple Dry 15, fold it underneath the ponytail, twist the hair and pin it in place. Repeat on the left side. Release the clip and let the ponytail ends fall over these sections. Finish by creating a simple fishtail braid in the ends of the hair and securing it with an elastic.
To turn this fishtail braid ponytail into an elegant updo, tuck the ends underneath and secure them with a grip near the nape of the neck. Lock in the style with an all-over blast of Redken Triple Take 32, and you’re done! Watch the video to discover how to do an elevated fishtail braid upstyle.
Back to Long Length Hair | Back to Main Index
Ponytail Hairstyles: Twisted Bun Updo
Learn how to transform a simple ponytail into a chic twisted bun updo in this tutorial with Sam Villa. Texturizing the hair before styling and working with four twisted sections give you a “perfectly imperfect” style with long-lasting hold.
Start by adding grip, volume and texture to the hair with the Sam Villa Textur Professional Texturizing Iron. Place the hair into a low ponytail and split it into four even sections.
Working with one section at a time, split a section into two strands, twist both strands to the outside and then cross over the top, repeating this until you reach the ends. Embrace the imperfection-- it will add a carefree touch to the finished style! Repeat this process with the other three sections until you have created four rope twists.
Next, “pancake” each twist by pulling apart the strands to create a more organic look. Weave the four rope twists together into a braid, lift the ends, wrap the hair into a loose chignon and secure it to the head with hairpins. This is your chance to let your creativity shine and add value by creating a unique and interesting shape! You can leave some of the ends sticking out or pin them into the bun, depending on your tastes and your client’s preferences. Finish with a high-control hairspray to set the style into place.
This versatile twisted bun updo works beautifully on all hair types, from fine hair (don’t skip pre-texturizing!) to curly and natural hair. Watch the video to master this quick and simple twist bun hairstyle!
Back to Long Length Hair | Back to Main Index
How To Create a Twisted Loop Headband Braid

Discover how to create a twisted loop headband braid-- a perfect special event style for festivals, proms, or even a wedding look. Twisting the hair until it coils back onto itself gives you a stunning twisted headband that looks like a braid.
Before starting this hairstyle, prep dry hair with Redken Iron Shape 11 and texturize the hair with the Sam Villa Textur Professional Texturizing Iron for added grip and pliability.
Ask your client to lean over to one side and finger-comb the hair so that it falls in one direction. Take a horseshoe-shaped section with the “bend” of the section just above your guest’s ear. Secure the rest of the hair out of the way in a low ponytail.
Separate a horizontal subsection from the top of the horseshoe (beside the ear) and twist it tightly towards the face. Place your middle finger at the base of the twist, loop the hair around in a clockwise direction and pinch it between your thumb and index finger.
With your free hand, pick up another horizontal subsection (next to the first one), add this hair into your pinch grip, combine the sections together and twist the hair towards the face. Make sure to place the second section next to the first section, rather than wrapping it underneath. When the hair begins to twist back around, place your middle finger at the base of the new twist, loop the hair around and pinch it between your thumb and index finger. Continue this process as you work your way around the hairline from ear to ear. It’s critical to keep the twists as tight as possible, so use your pincer grasp to maintain tension in the hair.
After adding the last subsection of hair, twist it until it coils back onto itself in a mini chignon shape. Wrap the ends around your thumb, fold them underneath the coil and pin them in place. Use your fingers to shape the loops by pancaking them or pinning them against the head. Then finish with Redken Fashion Work 12 to clean up flyaways and add medium hold.
There you have it-- a fresh headband “braid” made up of twisted coils. Watch the video to master this twisted headband braid!
Back to Long Length Hair | Back to Main Index
How To Create a Twisted Mohawk | Faux Braided Updo

Discover a cool & simple way to create a faux hawk updo by twisting hair to create the illusion of a braid. You're going to love this twisted hairstyle!
Back to Long Length Hair | Back to Main Index
Bubbles Up Style Technique

Create a fearless, fresh and modern up style with just 6 ponytails! This video clip is packed with a "how-to section" and "step-by-steps" to create a personalized silhouette for your client!
Build texture first so your up style has a more organic and less coiffed look to it.
Learn how to manipulate hairpins so they never fall out! Finally, take it further with a 'shammy' for a more editorial feel - The 'midnight look' vs. the '6pm look'!
Watch the Bubbles up style video to see how it's all done!
Back to Long Length Hair | Back to Main Index
Waterfall Braid Scarf Up Style

Create the illusion of a scarf with this easy to-do waterfall braid technique.
Grasp the technique and method for this braid and use it in your own way to create amazing results.
Back to Long Length Hair | Back to Main Index
How to Create a 4 Strand Twist Braid

Learning how to create a 4 strand braid is easy and fast when you follow the pattern that Sam shares in this tutorial.
Braids and plaits are the perfect accessory to any hairstyle and can be finished in so many creative ways.
Back to Long Length Hair | Back to Main Index
How to Put a Braid in a Braid

How do you make a braid more interesting? Put a braid in the braid!
This may seem so simple, but it really transforms a basic 3 strand braid into something beautiful.
Watch as Sam Villa really simplifies the pattern to help you create interest for your salon guests.
Back to Long Length Hair | Back to Main Index
French Pull-Through Braid Ponytail

Create the visual appearance of a faux dutch braid without having to braid at all!
The French pull-through braid doesn’t require any braiding skills at all.
In fact, if you can place a ponytail, you can master this look in no time at all!
Back to Long Length Hair | Back to Main Index
Attached Fishtail Mohawk Braid Into a Ponytail

Looking for a fresh, organic approach to liven up a ponytail? Take notice, what you are about to view adds not only visual excitement for your guest (and for others that are watching), this also adds value for your guest.
Back to Long Length Hair | Back to Main Index