Ignite your creativity for several new looks with one jaw-dropping style! In this video, Sam Villa, Redken 5th Avenue Global Artistic Ambassador and the Co-Founder Chief Creative Officer of Sam Villa shares one of his many, must-have styling tricks! An incredibly creative technique that can transform your up styling skills and open your creativity to explore new fun ways to style hair!

How Do I Achieve This Style?
Start with dry, smooth hair to avoid fly-aways or indentations in your style.
To begin your updo, you will create a ponytail at the crown area with all hair directed back. Be sure to have a hair bungee/elastic and hair pins nearby.
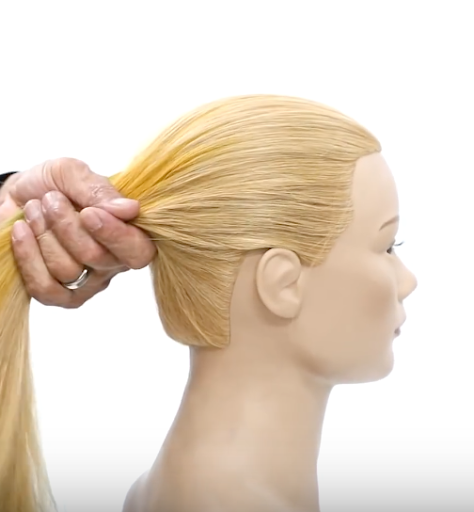
- A great tip to find the placement for your ponytail is to create what Sammy calls a hand pocket.
- Open your non-dominant hand with your thumb up, facing the ceiling and lay your other four fingers flat (pictured below).
- Place the knuckles on the back of your hand against the head at the crown.
- The curve in between your thumb and fingers should lay where your ponytail will be secured on the head.

- Use a Sam Villa Signature Series Paddle Brush to remove all tangles by holding the brush vertically and the handle facing down.
- Why hold it this way? The rows of the brush are vertical so it mirrors the grain of the hair allowing for better detangling.
- Brush the hair from the front and back hairlines into the hand pocket to gather hair into a loose pony.
To smooth and polish the hair:
- Keep your hand pocket secured against the crown and close your fingers around the pony (pictured below).

- Use the Sam Villa Signature Series Styling Brush to gather the hair from the front hairline back (ending at the hand pocket).
- Once the brush reaches the pony, loosen your grip to gather the smooth hair into the pony laying in your palm (pictured below).

- Close your grip back around the hair to secure (pictured below).
- Continue to brush all the hair around the head as you open and close your grip, until the desired smoothness is achieved.
- Keep your grip tight around the base of the pony at the crown.
- Grab your hair bungee (elastic) and place in between your thumb and forefinger of the hand holding the pony (Don’t loosen your grip).
- Allow 1-inch of the elastic to be left out (pictured below).

- Slide your thumb forward so that the middle of your thumb is touching your forefinger.
- Keep your grip tight.
- Wrap the long part of the elastic around the tip of your thumb once.
- Wrap the elastic around the tip of your thumb once more, then bring it under the index finger and around to the left side of the pony.
- Your index finger will hold the elastic in place by applying pressure to it laying against the head.
- Complete wrapping clockwise to reach the starting position (at the thumb).
- Wrap the elastic around the base of the pony clockwise with tension.
- Keep a tight grip on the hair.
- Follow this technique to wrap at least three times.
- Release your grip.
- Gather both ends of the elastic above the ponytail and tie as you would a shoelace- two times!
- Once the elastic is tied twice, keep both ends in your hands and cross your arms over one another, then pull tight (pictured below).
- You should hear a POP! This will give us the confirmation that the pony is secure.
- Choose to cut off the remaining elastic pieces or leave them as is.

- To cover the elastic, gather a hair pin (pin #1) and slide the closed end of the pin on a diagonal underneath the elastic that is holding the pony (slide halfway through).

- Gather a 1-4-inch of hair from the opposite side of the hair pin, and bring it up and over the pin.
- Wrap the hair around the pin counter-clockwise using tension.
- Place your thumb down to hold the piece securely as you wrap the hair around, until you reach 2-inches from the ends. Stop wrapping.

- Grab another hair pin (pin #2) and gather the remaining ends into the open part of the pin (as if you were threading a needle).
- With the ends gathered into pin #2 (outside left side of pin #1), pass through the closed end of hair pin #1 (still secured in pony-reference below).
- The remaining ends should end up on the inside right of pin #1.
- Place pin #2 down.

- Gather the remaining end, and pull on them as you glide pin #1 down and out of the pony.
- The ends should glide underneath the elastic as you pull the pin down.
To create the bun, be sure to have a donut, a cloth elastic, small elastics and hair pins readily available.
- Ask your client to lean forward.
- HOT TIP: Have your client place their elbows on each thigh, and have them rest their chin in between each fist.
- Gather the hair from the pony into the middle of the donut.
- Push the donut up to the base of the pony.
- Fan the hair out to cover the entire donut and smooth out the hair with Sam Villa Signature Series Styling Brush.
- Place the cloth elastic around the hair to wrap around the donut.

- Gather hair from the top of the bun and slice into three sections.

- Bring the three sections back and over the bun.
- At this point your client will sit upright.

- Braid all three strands once.
- Start gathering the hair from around the bun to include into your braid, directing all strands of the braid towards the inside.
- Be sure to maintain tension!

- Continue to braid working towards the inside of the bun and adding in hair.
- Once you reach the bottom of the bun, you will start to gather hair from underneath, bringing it over to the center.
- This will resemble a fishtail technique.
- Follow this technique to braid as far to the ends as you can.
- Tie with an elastic.
- HOT TIP: If you have an elastic that’s too thick, twist it to tighten it before you tie around hair!
- Hold the ends of the braid tightly with one hand, and gather hair from the top of the braid in your other hand.
- Pull on both ends at the same time to loosen the braid.

At this point, this can be a style in itself!
To achieve the up-style in the video:
- Pull onto both ends until the hair pops off the donut!
- Let go of the hair and allow it to fall into place.
- Grab the center of the braid with your fingertips and bring it up and over to the top of the pony.
- Create your up style by pinning into place.
- HOT TIP: Where you hold is where you pin!
Final Words
This technique allows for several looks from a night out to the runway! Use your creativity and run wild. From a smooth pony to a braided pony, to a unique up style, this one technique opens up an arsenal of new fun ideas! We hope you’ve enjoyed this video!
Recommended Tools for this technique:

Related Blog Posts: