As hairdressers we are constantly striving to set ourselves apart from other stylists and pushing our creativity is where it begins. A concept I constantly turn towards, is digging up old school patterns of "how to" cut hair. I've found that when I do this, I then can create what I like to call a hybrid haircut. By simply combining two haircuts from opposite ends of the spectrum, we are able to create a hybrid style and that's how we can set ourselves apart from the stylist down the road! I'm excited to share a great old school haircut, with a twist. Keep reading to see how it's done.
Recommended Tools For Success
- Professional 7" Dry Cutting Shear.
- Professional Reversible Blending Shear.
- Professional Long Cutting Comb.
- Professional Ionic Blow Dryer.
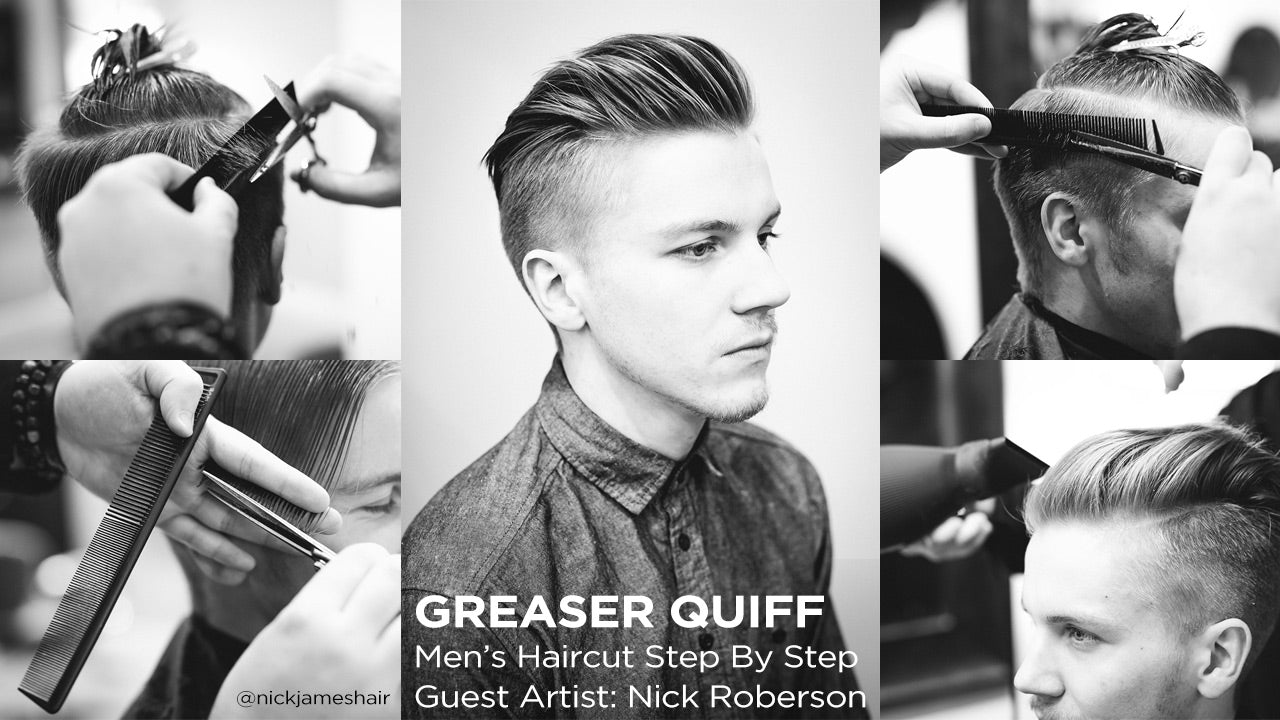
Grease Quiff Step By Step Haircut
Photography by Chris Bauer
Step 1: Isolate and control hair into a horseshoe parting just above the parietal. As a general rule (not a law) for this haircut, it's best to work off of the parietal for your parting. You can however adjust (by a half inch) if your clients head shape calls for a wider or skinnier parting. The wider the head, the skinnier the parting and vice versa.
Step 2: Using the wide teeth of your long cutting comb, begin your scissor over comb technique. Start cutting just in front of the ear up to about a half inch beneath the parietal using the width of your comb as a guide for the length.
You might be wondering, "Why a half inch beneath the parietal?"
Great question! A half inch leaves you room to blend. Giving yourself that room ensures you have space to blend smoothly and evenly to the top of your haircut. However, if you are looking for heavy disconnection in your haircut, continue your scissor work all the way up to the round of the head. Have fun with it!
Step 3: Continue your scissor over comb work around the round of the head to the opposite side to blend evenly. Working with the excess hair beneath the parietal, use your Reversible Blending Shear to remove weight and add texture.
Step 4: Starting at the back / bottom hairline using the fine teeth of your long cutting comb, begin your tapering technique up to the occipital. Continue using the width of your comb as a guide for your length.
Hot Tip: Moving your clients head to fit in difficult and tight areas will help your taper be smooth and even. As a general rule, have them tilt their head to the floor so you can get your comb and shear in a comfortable position while cutting!
Moving To The Top Section
Step 5: Section hair off ear to ear (leaving you with a half moon section) while working within your horseshoe section. Create your beginning guide by starting at the center back working in half inch vertical sections. Point cut hair at 45 degree elevation above the horizontal line to create a graduated guide. Continue throughout the rest of your vertical sections working in half inch increments.
Step 6: Section the hair into a center part using the nose as a guide. Bring each section down to the side of the head and cut at an angle using the corner of the eye as a guide. Cut an ascending (diagonal) line from the corner of the eye to the top of the parietal / side of the crown to create your guide for the back. This will result in shorter hair at the back and longer in the front.
Step 7: Comb hair straight towards the face and begin to slide / channel cut to remove bulk and create noticeable texture.
Step 8: Prep hair with Redken Guts 10 for added volume. Spray the product down toward the scalp in 1 inch sections, then begin blow drying in small sections using a vent brush, pushing the hair up and away from the face for more volume. Finish with a grooming cream for movability and texture.
Finished Look: Give this look a try with your male clientele. Messy and undone styles are what we will be seeing a lot of in 2015 so give your guests a taste of the hottest trend!


