
My name is Torie Bliss and on Instagram you can find me at @glambytoriebliss. I am totally obsessed with everything boho, but boho hair is at the very top of my list.
Stacked combo braids are all over the place and right now they are one of my absolute favorites to create. The results you can achieve when combining braids together is endless. Simple to do yet looks complicated - it leaves people wondering how in the world you did it. A stacked braid can be worn anywhere, whether you are at the office or dancing around at Coachella or another music festival. You can rock it anywhere and everywhere.
Step by Step | How to Create a Stacked Combo Braid

When braiding I like to begin on hair that was washed and blow dried the day before. You know, that oh-so perfect 2nd day hair! If your hair was just washed then a dry texture spray works wonders to add a little texture and grit.
To start, I added my 24" clip in hair extensions for extra thickness, some color dimension and about 3 inches extra length. Then I prepped my hair roots to end with the Sam Villa Textur Iron (this iron is a dream)to expand the hair making it thicker and easier to work with. After my entire head was full of micro crimps I used my Sam Villa Styling Brush to smooth out the texture and get my hair ready to braid. Time to start the braiding.

Fishtail braids are my favorite! I took two triangle sections on each side of my head near the front hairline and did two regular fishtails moving toward the back of my head. To make them fuller and more fabulous I pancaked the braids. If you are not familiar with this method, it is when you pull apart the braid from the bottom to the top to make it appear wider and thicker, giving it that boho-feel. Next, drape one of the fishtails back across your head and pin it into place. Take the other fishtail and do the same thing but this time cross over the previous fishtail braid.
HOT TIP: While pancaking your braid pull each strand out separately instead of a bunch at once and go slow. Doing this gives the braids extra detail and keeps the braid from appearing too messy. Keep repeating this method as many times as needed to achieve your desired look. Secure with an elastic once you finish pulling the braid apart.
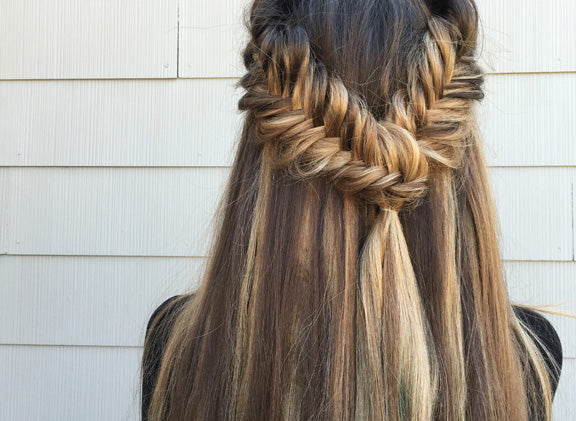
Once the fishtails are nice and secure to your head take the two tail ends of the fishtails and combine them with one elastic. Make sure the elastics you used to secure them separately are below the elastic you are putting in. Now that they are together remove the other two elastics.

With the remaining hair of the fishtails in your hand, pick up some extra hair from each side and underneath. I like to use a horseshoe-shaped section as this will create a nice thick braid vs if you just braided the hair that you secured in the ponytail. Now that you have plenty of hair to work with begin by creating a fishtail braid below the elastic.
HOT TIP: If you take small pieces and start crossing over hair from the highest point of the section, it will cover the elastic from your previous step.
Once you get down a little ways switch to a 3 strand braid and then back to a fishtail. Mix it up! This is where you have creative freedom to do whatever you would like. Again, use the pancake method to pull the braids apart and then secure with an elastic.

Now take that bad boy and clip it up out of the way. With the remaining hair underneath, create another fishtail braid. Take large sections as you work your way down. When you get to the bottom pancake, pancake, pancake, like a lot. You may feel like it is too much, but for a stacked combo braid you want the bottom braid to be as wide as possible so it peaks out the sides of the middle braid. Secure with an elastic.

Take the middle braid down and about half way down, open up a section of your bottom braid and weave the middle braid through it. The tail end of the middle braid will now be behind the bottom braid. Secure with some bobby pins from behind. Then a little ways down, split open the bottom braid again and weave the tail through from the back to the front. With the tail end in the front split it into two. Take each section and wrap it around to the back of the bottom braid and pin it to create a downward V. (The V is shown in next photo. I randomly did this one day and it has become a signature thing in my braids as it creates a fun focal point).
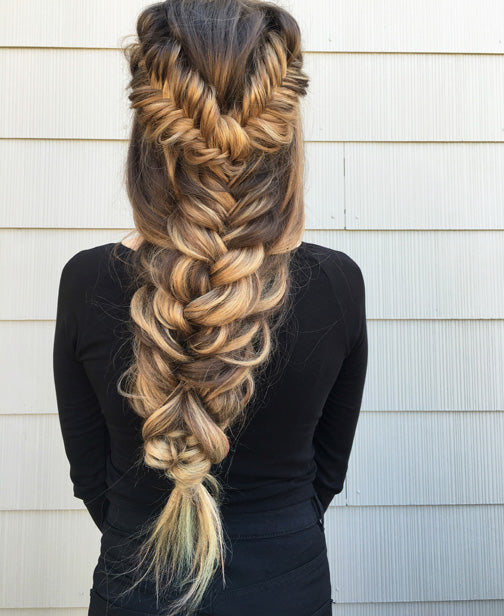
There you have it! A fun bohemian braid that is full of texture and can be worn just about anywhere. Finish your hairstyle off with a light to medium hold hair spray.
To give this braid a little more pizzazz you can add some temporary hair color. I used Joico InstaTint in mermaid blue and pink then topped it with a KITSCH hair chain. The same style yet two totally different looks!

If you recreate this look be sure to tag #glambytoriebliss and #samvilla - we can not wait to see your creations!
I hope you enjoyed this piece + learned something new!
- Torie Bliss
Have questions? Leave them in the comment box below and please follow me on Instagram for braid inspiration and tutorials!

